Creating ASP.NET Core Web app
In this tutorial, I will show you that how you can develop your first ASP.NET Core web application even if you are on Windows, Mac, Linux but you need to install the .NET Core SDK. You must need to install .NET core from .NET Core Installation guide on your machine.
So, after installing .NET Core SDK follow the steps
Step # 1:
Create new directory or open and empty directory in command prompt window![]()
Step #2:
Navigate to the new directory
![]()
For additional information, we can create different number of ASP.NET Core application, for our convenient Microsoft provided different template that you see by “dotnet new help” command
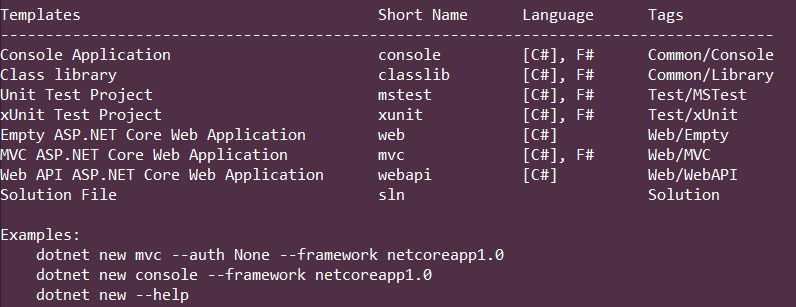
As you see Console Application that we have created in previous tutorials about .NET Core but here we are going to create Web/Empty project by using the 5th one template (that is Empty ASP.NET Core Web Application)
Step # 3:
So, let’s create by typing “dotnet new web” and press enter

After that, you will see the following folder and files in the directory that donet web template created for us.

So, let me explain a little bit about these files.
wwwroot:
All Static Files, assets that serve directly to the client side will be placed inside this folder means CSS files, JavaScript files, images (png, jpg, jpeg), etc., but the razor files will not be placed here. It is similar convention like in Linux/Unix www, public_html, htdocs, and we can access these files from root of project
Note: Before using this feature we need include “Microsoft.AspNetCore.StaticFiles” dependency package from Nuget and then configure it in Configure() method by adding app.UseStaticFiles() method.
coreweb.csproj:
it is known as C# Project and contains compilation information about our project, assemblies, and packages with versions in XML format.
Program.cs
This file is important because it contains Main() method and information about the root of the project and most important it is used to initialize, build, run the server either on (IIS or Kestrel) and host the application.
Startup.cs
Startup.cs class is used to configure the services and middleware to the request pipeline. It contains two method ConfigureServies() and Configure(). ConfigureServices() is used to register services to dependency injection container and is called before the Configure() method. Configure() method allows us to add the middleware to the request pipeline. Middlewares are used to handle request and response when the request comes.
Step # 4:
Restore the packages

Step # 5:
After restore completed run the application to see the output

Step # 6:
Open the URL (http://localhost:5000) in your browser and the output will look like shown below
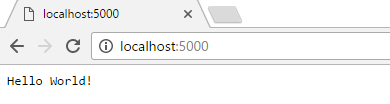
So, we have successfully created our first ASP.NET Core web app and “Hello World!” is coming from Startup class’s Configure() method but I will show you that how you can add HTML files to your project to make this fancy, so, follow the steps
Step # 8:
Open your project in Visual Studio Code, or you can use any other editor

Step # 9:
Open your .csproj file and add the following package to your file and save
“Microsoft.AspNetCore.StaticFiles”
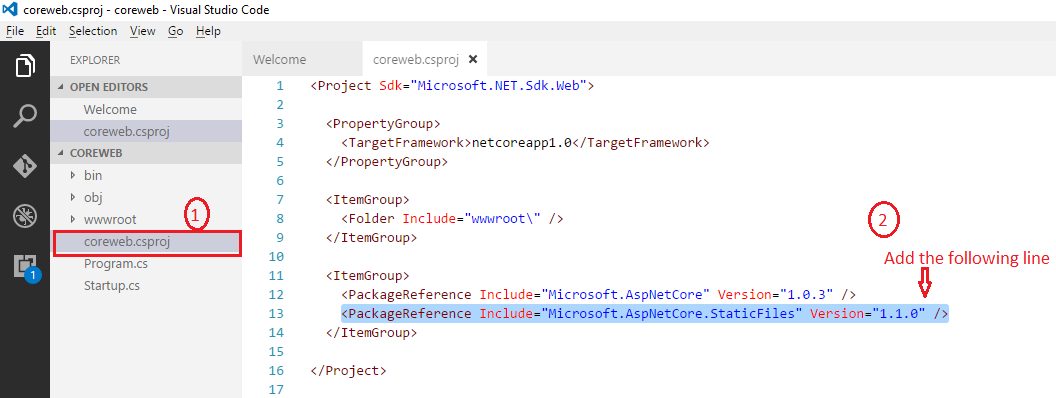
Your .csproj files look like this
Step # 10:
After adding package save the file and then restore
Step # 11:
Now create a new index.html file inside wwwroot folder and add some HTML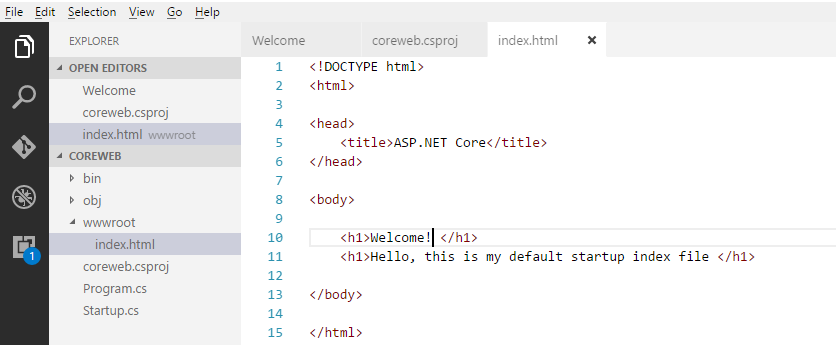 code
code
Step # 12:
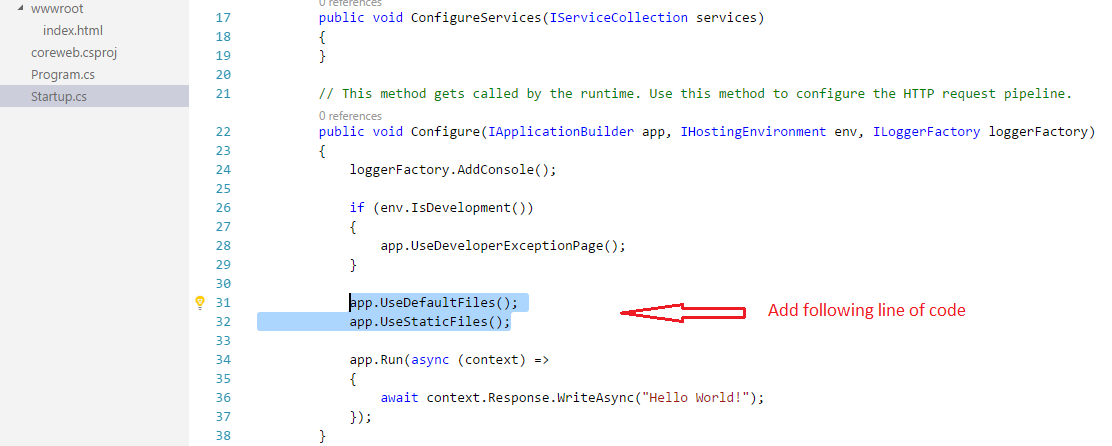
Open your Startup.cs file and add the following code before the app.run()
App.UseDefaultFiles();
App.UseStaticFiles();
Step # 13:
Now, It’s time to run the app to see output
dotnet run
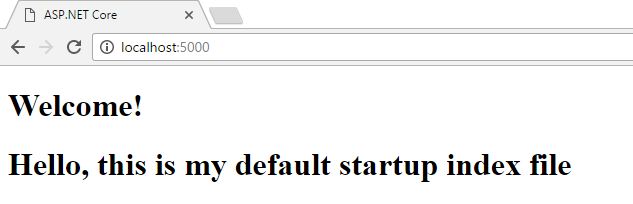
Step # 14:
Open the (http://localhost:5000/index ) in your browser
In the end, if you are facing any problem write below in the comment, and I will respond ASAP. In the next tutorial will learn about ASP.NET Core MVC.